

Monday, April 25, 2011
Monday, April 18, 2011
2 Cars at Once?
Well tonight I finally finished the front sway bar on the vette so I'll do the write up Good Friday while I'm recovering from the previous party night in Toronto. Also managed to pop the hood on Megan (silvia/240), checked the turbo elbow for cracks, and just refreshed my memory on things to do.
May 1st is the big annual "Bing's Meet" where the true 240 and Nissan owners congregate. Last year I won the award for People's Choice and I don't plan on a repeat, once is good enough. Its time for the car to build more character then style if you know what I mean. I do plan to fix Megan up prior to the meet with the basic TLC and probably redo the cracked front lip, and maybe I can find a shop to cut and weld my fenders and mount the flares. I don't have the tools to do the flares on my own so I'll bite the bullet and hope they do it right but still need to find a shop in short notice

Corvettes Suck, Extended Studs Install Process(venting on my progress)
Boring post, reader beware...... I'm posting simply so people don't think I've abandoned blogging.
So...... I started this weekend with the thought of possibly getting the vette on the road. Yeah that's not happening now. I planned to do the simple things first such as front sway bar install and new extended studs in the rear.
I started with the extended studs because I wanted to mount my fat ass wheels with sapcers and see how pretty she looks. The moment I took off the brake disc I realized this may be bad. I've never ever taken a look longer then 2 seconds at drum brakes or my rears on the vette before today.
The problem is the corvette has a drum ebrake that sits behind the hub preventing me from knocking out studs or installing new ones. Well there was enough space in places so buy rotating the hub I had enough back space that i felt comfortable hammering away at the stud. Holy crap!!!! the studs were in there good. Someone must have torqued the wheels to some ridiculous amount at some point. I managed to knock out one with a sledge hammer but that was no easy task and I really didn't want to do it again as everything is taking the impact and the car was shaking pretty good even with the frame on stands. Shitty part is that there wasn't enough space for the stud to slip out from between the drum and hub.
OK, time to remove the hub. Run to Crappy tire, grab a 36mm socket, remove big f'n nut and it comes right off. Not the case as GM puts 3 massive torx bolts behind the hub holding everything together. I go on the net to find out that i have to remove the entire half shaft just to make space to undo the bolts. FML, this sucks, I take a nap.
I start taking apart the rusted half shaft telling my self how much this sucks, I want to meet the genius that decided to put the bolts on the back and possibly kill him, and so on..... Then i stop half way and determine that i will remove the three bolts without removing the shaft which happened. With the help of different extensions in combination with more different extensions all different for each bolt and in-between all the suspension arms, I was finally able to remove the hub. Pic of hub off and the drum brake remaining.

But now its time to get those pesky studs out. After trying the sledge hammer with a socket to no avail I decided to stop monkeying around and use a vice. I still couldn't pop them but the "just a little more" mentality was saying "just a little bit more torque should do it". A 15mm socket, a short extension and placed on the end of the vices' handle should suffice. 20deg of rotation later and this is what happens.....

... I'll stop there but still have all these items to install

Monday, April 11, 2011
Slow Progress
Well nothing exciting to post. I planned on completing the corvette come thursday/friday but I've run into an issue with the air pump so I have to replace the pump with a pulley. They sell setups for $200 which is ridiculous when it probably costs no more then $40. I'll post up what I do by weeks end.
What also sucks is the front sway bar install. I'm going to do a write up when i finish because the 4 line instructions that came with it are useless. I should seriously post them up because all the say is "remove sway bar from chassis. remove endlinks from chassis. install in reverse order using supplied parts." I'm not impressed with VB&P but the sway bar should perform to expectation making all things good and bad equal.
Some status pics
Something about a car on jack stands is hot! (fyi I'm crazy)

All the A.I.R parts removed. Tin snips helped alot but bolt cutters would have been better. Probably 20-30lbs of junk.
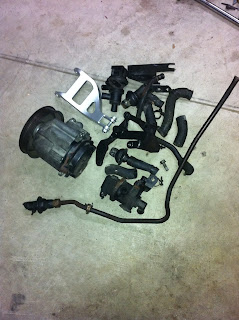 Engine bay during removal

I know... BORING!!!!!
hopefully parts come in and things move faster
-Jaz
What also sucks is the front sway bar install. I'm going to do a write up when i finish because the 4 line instructions that came with it are useless. I should seriously post them up because all the say is "remove sway bar from chassis. remove endlinks from chassis. install in reverse order using supplied parts." I'm not impressed with VB&P but the sway bar should perform to expectation making all things good and bad equal.
Some status pics
Something about a car on jack stands is hot! (fyi I'm crazy)

All the A.I.R parts removed. Tin snips helped alot but bolt cutters would have been better. Probably 20-30lbs of junk.


I know... BORING!!!!!
hopefully parts come in and things move faster
-Jaz
Monday, April 4, 2011
Project Kira Underway
Spent the majority of my time in the garage this weekend but things were rough going. So, here is a quick post with only a portion of what was done over the weekend.
Vette Brakes and Performance Rear Sway Bar Install:
Quick comparison shot below shows that the rear sway bar (26mm) is noticeably bigger then the stock. The largest oem rear bar found on C4s is 24mm mind you there is a 25mm in existence but good luck finding that as I believe it wasn't a typical factory offering. Depending on the options when purchased the car can have a bar as small as19mm.

Install is straight forward and the only difficult part was installing the mid mount bushings as they are thick plastic which required work with a heat gun to soften them up, allowing them to separate enough to fit around the bar.
I painted the the mounts with some anti-rust paint to add some "bling" factor and hopefully deter rust for some time. I also found some new hardware as the kit did not include any (-1 for VB&P sway bars).
Pic below of the sway bar mounted.

-Jaz
Subscribe to:
Posts (Atom)